Draft 03/28/2002

(Click photos to enlarge)
| Home | Software | Hardware | Mathematics | Contact Info |
Piehl Systems - Advanced Docking Station for onHand
Draft 03/28/2002
(Click photos to enlarge)
Overview
This article describes techniques enabling the combination of the onHand docking station with other components. The goal is to provide the following capabilities:
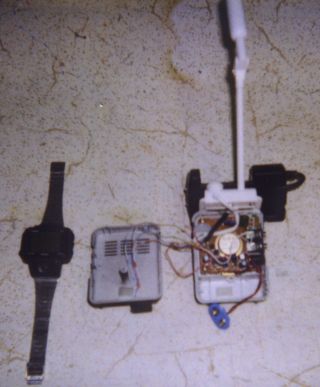
1. Keyboard - This project uses the Matias Half-Keyboard (www.halfkeyboard.com) which is a one-handed serial keyboard which allows touch-typing. It is also very portable. A folding keyboard might also be used for this project.
2. Sound - The onHand will be amplified and can drive a conventional speaker with a quality that is better than the internal beeper. The onHand alarms can also be greatly amplified and should be loud enough wake up almost anybody in the morning.
3. Lighting (optional) - The Itty-Bitty Book Light is used in this project to illuminate the onHand display and eliminates the need to use the EL backlight constantly. It works very well for this purpose and also serves as a very nice small desk lamp, even while the onHand is not docked.
4. Button Extensions - When the onHand is placed in the docking station, the ENTER and MENU buttons usually are concealed. By installing steel rods through the right-hand side of the docking station, the buttons can be accessed while docked.
Other potential features are listed near the end of this file.
Project Description
Make sure you understand that you'll be voiding any warranties and endangering the continued use of your onHand by doing anything in this article. Be sure to wear safety glasses and think carefully before doing anything mentioned here - continue at your own risk.
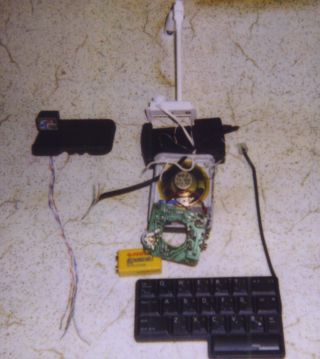
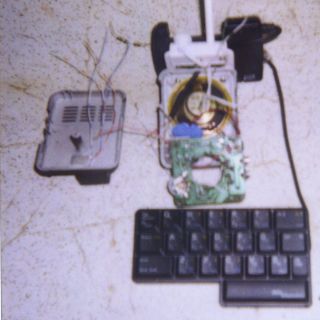
The Radio Shack Speaker/Amp unit is a stable base for this project and is inexpensive (approx.$12). It provides audio and allows the onHand DS-20 docking station to be mounted on a beveled edge which is comfortable for viewing. The 9V battery inside the unit can power all components, including the keyboard and the DS-20. An AC adaptor will be used to power the unit and recharge the internal 9V battery. However, at this time, the onHand itself is still powered by internal lithium cells.
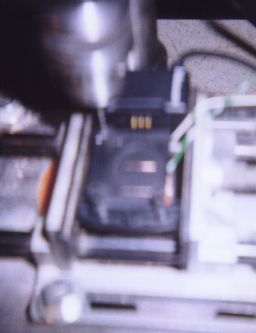
Audio will be picked up by placing copper wires across the DS-20 so they contact the back cover of the onHand. For future expansion, I included two wires: one contacts the battery cover, the other contacts the actual onHand back cover. I use the latter for audio. The signal from these two wires alone can be used for audio, if you need to pick up audio without the DS-20 involved. However, in my implementation, only one is used since the DS-20 and the speaker/amp will have a common ground.
The half-keyboard connector is replaced with an RJ-11 telephone connector. A jack is mounted on the rear of the speaker/amp to accept the keyboard connection.
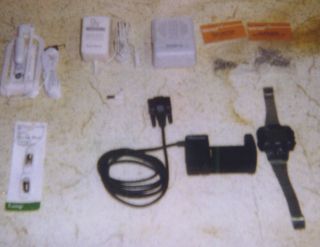
Parts List
(Radio Shack part # unless otherwise noted)
| Description | Part No. |
|---|---|
| onHand Docking Station | Matsucom DS-20 |
| Matias Half-Keyboard | (Palm III model) |
| Mini Amplifier/Speaker | 277-1008C |
| Book Light | Itty-Bitty Book Light |
| 7.5V Lightbulb | 272-1133A |
| 9V AC Adaptor | 273-1767 |
| 9V battery | (NiCd or NiMH) |
| Machine Screws | 64-3010A |
| Machine Hex Nuts | 64-3017A |
| Steel Music Wire | (3.5 mm diameter) |
| Copper Wire | (approx. 0.5 mm dia.) |
Step 1
Disassemble the speaker/amp. If you wish, the unit can be spray-painted at this time (shown below in flat black) after covering the PC board. Also, the DS-20 can be disassembled in the 3 major components. The right-hand side will be drilled to allow the steel music wire to be installed for button accessibility. Using a jigsaw, remove the center section of the base of the book light and cut the outer sections so they extend only 15 mm. Replace the Book Light's 4.8V bulb with a 7.5V bulb. The stock 4.8V bulb cannot handle 9 volts and will likely burn too hot. The 7.5V replacement will consume less power (at 220 mA) and not produce as much heat.
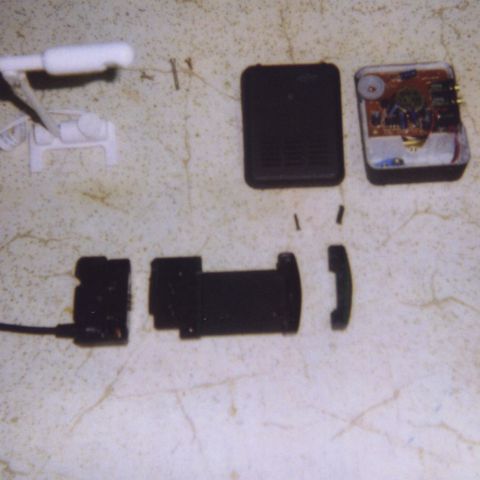
Step 2
Remove the label on the bottom of the DS-20. The audio wires which need to run through the unit might be affected by the foil label. Using a 0.5 mm bit, drill four holes for the copper wires. They should be positioned about 20 mm apart. After the wires are twisted tightly in place (exiting the bottom of the unit), lift the center of each copper wire so they act as leaf springs, making contact with the onHand whenever it is docked. Next, drill two 2 mm holes in the top of the speaker amp along the top bevel. Watch where the holes come through. I've found that holes 13 mm from the left surface of the unit and 15 mm from the right surface come through at a convenient place inside the beveled surface where machine nuts can be placed. Drill corresponding mounting holes in the central part of the DS-20.
Step 3
Use a hacksaw to cut two 13 mm long pieces of 3.5mm (9/64") diameter steel music wire. Put the pieces in a drill press and round the ends using a file. Next, drill a 2 mm diameter hole through the middle of each piece, perpendicular to the cylindrical axis. Tap a hole for the machine screws, which will act as a stop to prevent the steel rods from sliding out. Drill two 3.5 mm holes in the right-hand side of the DS-20 to allow the pieces to slide easily and align with the onHand buttons. Note that the alignment of the pins with the onHand buttons is critical. Insert a short (1/4") machine screw in this hole after each piece is inserted in the right-hand side of the DS-20. Each screw, when twisted in an appropriate amount, should occupy one of the open spaces in the right-hand side of the DS-20 without binding up.
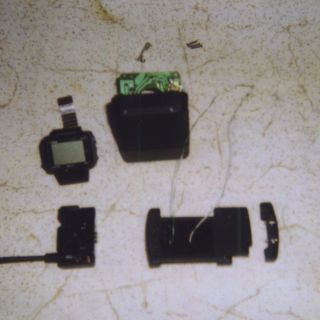
Step 4
Install an RJ-11 jack on the back cover of the speaker/amp. Make sure 4-conductors are available and run them thru a hole drilled in the jack and speaker/amp cover. Crimp an RJ-11 connector on the Half-Keyboard, replacing the Palm III connector. You can also crimp another RJ-11 connector on the cord coming from the 9-pin serial connector. This will restore normal PC docking capability, if needed. Also, run the DS-20 and Book Light wires thru a hole drilled in the top of the unit.
Step 5
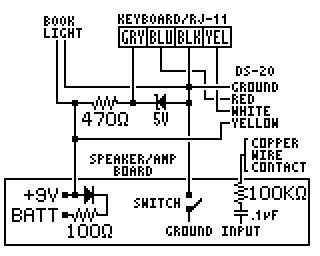
Mount the Book Light and the DS-20 on the top of the speaker/amp. A 100 ohm resistor and a diode can be installed between the poles of the AC-adaptor connector on the circuit board. This step will provide a recharging circuit for the 9V battery. Skip this procedure if you plan to use an alkaline battery. Also, positive and negative power wires should be soldered in place at this time. Also, cut the audio input lead on side of the input jacks. This must be cut and bent out of the way because the jack grounds out this lead when a plug is not inserted. This would short out the onHand's power, so cut the lead and solder a 0.1 microfarad capactor and a 100K ohm resistor to it. The capacitor and resistor can filter out some noise generated from other components.
Step 6
Install the circuit board and solder together a 470 ohm resistor and a 5V zener diode. This will act as a power converter to supply a lower voltage to the Half-Keyboard. The DS-20 can be powered directly from the 9V source using its yellow wire. Also, connect the transmit and receive lines on the DS-20 to corresponding lines on the RJ-11 jack. The Half-Keyboard wires should be crimped into the RJ-11 connector so that its yellow wire will join with the DS-20's white wire.
Using the new docking station
The on/off switch built into the unit's volume control will power-up all of the components. Adjust the volume to a comfortable level. At higher volume levels you will hear clicks or chirps from the unit when navigating folders or running programs. There is also a distinct tone when accessing flash RAM. Any sounds sent to the beeper (alarms, etc.) should be greatly amplified by the unit.
Plugging in the Half-Keyboard while running Filer will sometimes activate the docking mode of the onHand. The onHand usually assumes that any serial connection is from a PC. For this reason, the keyboard should only be plugged in while running a program which recognizes it.
Schematic Diagram
Future Possibilities
onHand recharge - by applying a voltage potential to the battery cover, it should be possible to recharge batteries that are inside the onHand. The lithium cells are not rechargable, so a rechargeable type that fits in the same space would be needed.
E-Mail - The audio output of the amplifier/speaker is already sufficient to be picked up by a telephone handset or cellular phone. It should be possible to write software to send e-mail messages acoustically, similar to PocketMail.
Keyboard Driver - By intercepting Filer's docking mode, it should be possible to write a driver that redirects keystrokes to the onHand's on-screen keyboard. This might extend the keyboard's ability to programs other than those specifically written to handle it.
Notice
Some products and components in this article are covered by intellectual property laws. Construction and applications of this project are limited to personal use.
Piehl Systems provides this information to encourage development and may not be held responsible for the accuracy of this information or any results you may have.
Copyright 2001 - Piehl Systems